If your bike suddenly shuts off mid-ride or the throttle feels unresponsive, don’t panic. Knowing how to troubleshoot e-dirt bike controller issues is a must-have skill for riders and parents who want dependable performance and fewer surprises. The controller is the “brain” of your electric dirt bike, and when it glitches, everything from power delivery to throttle response can feel off.
In this guide, we’ll show you in simple steps exactly how to troubleshoot e-dirt bike controller issues so you can spot wiring faults, error codes, or weak battery signals before they ruin your ride. Think of it like having a pit crew in your garage—quick checks and small fixes that bring your bike back to life ⚡.
👉 Quick tip: if you’re just starting out and want the bigger picture of how these machines work, check out our complete beginner’s guide to electric dirt bikes. It connects all the dots so today’s troubleshooting will make even more sense.
By the end of this walkthrough, you’ll not only understand how to troubleshoot e-dirt bike controller issues, but you’ll also feel confident handling common problems like power loss, faulty throttle signals, or wiring corrosion.
Key Takeaways
- Common controller issues include power loss, throttle failures, wiring faults, and error codes.
- Most fixes only require basic tools and patience.
- Understanding your bike’s wiring and battery system is half the battle.
- Preventive care can save you from costly replacements.
⚡ Here’s what you’ll walk away with: quick links below help you jump straight to the section that solves your exact problem 👇
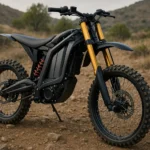
Understanding the Role of the Controller
The controller is often called the “brain” of an electric dirt bike because it manages the flow of energy between the battery, motor, and throttle. Without it, the bike simply won’t respond the way you expect. Riders who want smoother acceleration, reliable braking systems, and consistent torque need to understand how this component works.
When learning how to troubleshoot e-dirt bike controller issues, it’s important to first recognize that many problems come from miscommunication between the controller and other parts of the bike. A weak battery signal, loose wiring, or faulty throttle response can make the controller appear broken even if the unit itself is fine.
Think of it like the motherboard of a gaming PC 🎮—if one cable isn’t connected properly, the entire system struggles. By identifying the role of the controller early, riders and parents can better diagnose problems such as power surges, throttle lag, or even overheating circuits. This foundation makes every repair step that follows much easier to handle.

5 Signs Your Controller Might Be Failing
One of the first steps in diagnosing controller problems is spotting the early warnings before they turn into complete failure. Riders often notice sudden power cuts, which can make the bike stall without warning. This is frustrating, especially for beginners or parents watching their kids ride.
Another common issue is an unresponsive throttle. When twisting the grip gives no reaction, the signal between the throttle and the controller may be disrupted. Overheating near the controller box is also a red flag—too much heat can damage sensitive electronics and shorten the lifespan of your system.
Flashing error codes on the display are a clear indicator that something is wrong. These codes often point toward wiring faults, battery voltage drops, or internal controller errors. Strange buzzing or clicking sounds can also mean the unit is struggling to regulate current.
If you can identify even one of these warning signs, you’re already on the right path toward knowing how to troubleshoot e-dirt bike controller issues effectively. Being aware of these patterns makes repairs faster and keeps your dirt bike ready for action 🏁.
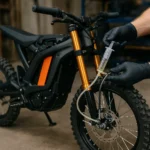
Visual Inspection First
Before diving into tools and diagnostics, a simple visual check can reveal a lot. Start by removing the protective casing around the controller and looking for obvious damage. Burnt wires, melted connectors, or discoloration on the circuit board usually signal overheating or short circuits.
Loose connections are another common culprit. A plug that looks secure from the outside may still have a weak pin inside. Giving each connector a gentle tug can help spot hidden problems. Rust or corrosion, especially around areas exposed to moisture, also weakens the flow of electricity and can mimic more serious failures.
Taking a few minutes to carefully inspect the hardware not only saves time but also prevents unnecessary part replacements. Riders who want to know how to troubleshoot e-dirt bike controller issues effectively should always begin here. A trained eye during inspection can often solve what seems like a big problem with just a quick fix 🔧.
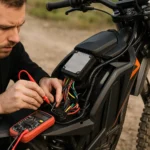
Test the Throttle Response
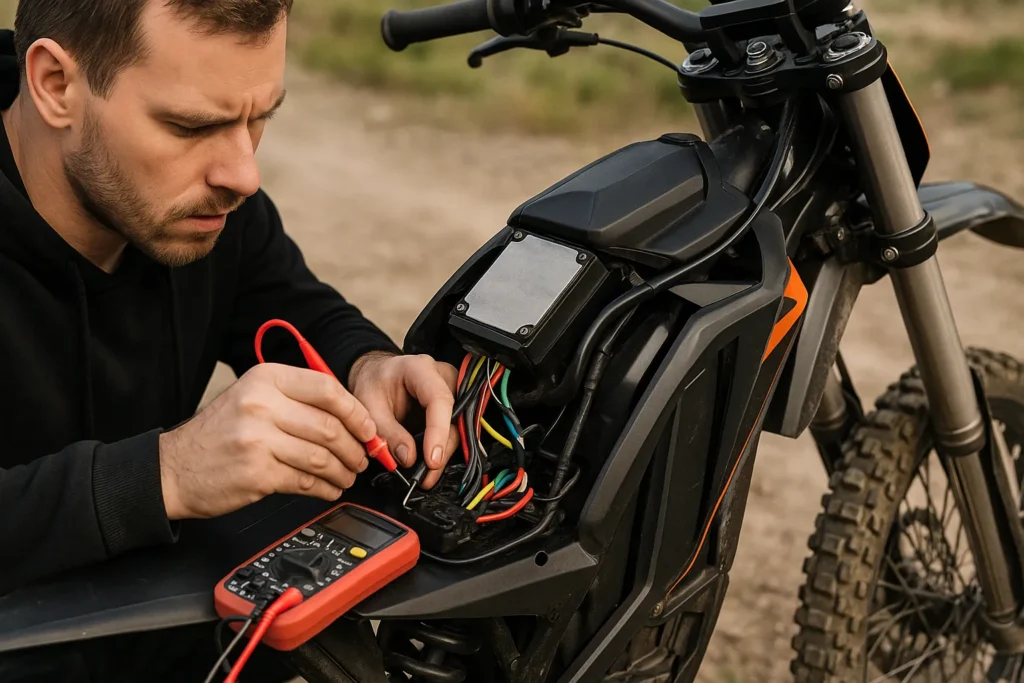
A controller that seems unresponsive often points back to the throttle. When you twist the grip and nothing happens, the first step is to check if the signal is reaching the controller correctly. Using a multimeter, riders can quickly measure whether the throttle is sending the right voltage.
Sometimes, what feels like a dead controller is actually a weak or inconsistent throttle signal. Damaged wiring, dirty connectors, or loose pins are frequent causes. Cleaning the contacts and ensuring the plugs are snug can often bring the throttle back to life.
It’s also worth noting that not every sudden loss of acceleration comes from the controller itself. A failing throttle sensor or poor wiring layout can mimic these symptoms. For a deeper breakdown of what really happens when controllers fail, check out this detailed guide on electric bike controller failure causes and solutions.
By understanding how throttle input translates into motor output, riders and parents can approach troubleshooting more confidently. This is an essential step for anyone who wants to master how to troubleshoot e-dirt bike controller issues and keep rides running smoothly ⚡.
Verify the Battery & Voltage Output
Many riders assume the controller is the problem when, in reality, the battery is at fault. A weak or inconsistent battery can create the same symptoms as a failing controller, such as sudden power drops or sluggish acceleration. That’s why checking voltage should always be part of your troubleshooting routine.
Start by measuring the resting voltage of the battery with a multimeter. Then, test again under load while the motor is engaged. If the voltage drops dramatically, it’s a sign the battery can’t supply enough power. This can cause the controller to cut out or behave unpredictably.
Learning how to troubleshoot e-dirt bike controller issues means also understanding that the controller relies heavily on stable input. Without steady voltage, even a perfectly working controller will struggle. Keeping your battery charged, stored correctly, and regularly tested will save you from unnecessary replacements and keep your rides consistent 🔋.
Decode Error Codes (If Available)
Modern electric dirt bikes often display error codes when something goes wrong. These codes are like clues pointing toward the source of the problem, whether it’s throttle failure, low voltage, or wiring faults. Paying attention to them can save a lot of time during diagnostics.
Each brand uses different patterns, such as blinking lights or digital codes on the display. For example, three blinks might indicate a throttle issue, while five blinks could mean the battery is underperforming. Always check your manual for the exact meaning of each signal.
For riders who want a broader picture of how these systems interact, our beginner’s guide to electric dirt bikes explains the core components and how they communicate. With that context, understanding error codes becomes much easier.
By combining manual references, real-time tests, and your own observations, you’ll be better prepared to handle error messages and apply the right fixes. This is a key step when learning how to troubleshoot e-dirt bike controller issues effectively.
Inspect Wiring & Connectors
One of the most overlooked steps in diagnosing controller problems is checking the wiring and connectors. Even the smallest crack in insulation or a loose pin can disrupt the flow of electricity and cause erratic performance. Riders sometimes blame the controller when it’s actually a wiring issue hiding in plain sight.
Look closely for signs of corrosion, especially around connectors exposed to water or mud. Dirt buildup can also prevent proper contact, creating resistance that leads to overheating. Giving connectors a firm push or gentle tug helps confirm if they’re fully seated.
This stage is essential for anyone who wants to master how to troubleshoot e-dirt bike controller issues. Think of it as checking the arteries of your bike’s electrical system—if the flow is blocked, the “brain” can’t function properly. Clean, tight, and secure wiring ensures smoother rides and extends the life of your components ⚡.
Swap or Reset the Controller
Sometimes the fastest way to rule out a deeper issue is to reset or temporarily swap the controller. Many models come with a small reset button that can clear minor glitches, much like restarting a computer. This simple step often restores normal operation if the fault was caused by a temporary surge or signal interruption.
If resetting doesn’t solve the problem, testing with a compatible spare controller can help confirm whether the original unit is damaged. When swapping, make sure the new controller matches the correct voltage and amp rating for your bike to avoid overloading the system.
Learning how to troubleshoot e-dirt bike controller issues includes knowing when replacement is the smarter choice. A controller that repeatedly overheats or shows erratic behavior after resets is usually better replaced. Having a backup on hand ensures less downtime and more time on the trails 🏍️.
Pro Tips to Prevent Future Controller Issues
The best fix is often prevention. Keeping your electric dirt bike in good condition reduces the chance of sudden breakdowns and controller failures. One of the simplest steps is storing your bike in a dry garage instead of leaving it outdoors. Moisture is a silent enemy that corrodes connectors and weakens the system over time.
Regular cleaning is also important. Dust, mud, and debris can block airflow around the controller, leading to overheating. Using a soft brush or compressed air after every ride keeps the electronics safe. Applying dielectric grease to connectors helps protect against corrosion and ensures smooth current flow.
For riders serious about reliability, avoid overloading the bike with aftermarket parts that draw more power than the controller can handle. Respecting the limits of your system is part of mastering how to troubleshoot e-dirt bike controller issues and ensuring long-term performance. Following these habits makes every ride safer and extends the lifespan of your components ⚡.
Common Controller Issues & Quick Fixes
When problems appear, it helps to have a clear list of common symptoms and solutions. Many riders panic when their bike suddenly loses power, but most issues have simple fixes if you know where to start.
| Problem | Likely Cause | Quick Fix |
|---|---|---|
| Sudden power loss | Loose connector, weak battery | Tighten plugs, recharge, test cells |
| Throttle unresponsive | Signal failure, bad sensor | Check wiring, replace throttle unit |
| Error codes blinking | Low voltage, wiring fault | Inspect cables, recharge battery |
| Overheating controller | Poor airflow, overload | Clean dust, reduce power demand |
| Buzzing or clicking | Short circuit, motor strain | Reset controller, inspect for damage |
Using this type of checklist keeps troubleshooting organized and helps riders decide whether the fix is simple or requires professional service. By keeping track of symptoms and applying quick solutions, you’ll gain confidence in how to troubleshoot e-dirt bike controller issues without wasting time or money.
Internal Maintenance vs. Pro Help
Not every repair needs professional tools, but knowing your limits is crucial. Simple maintenance like cleaning connectors, checking battery voltage, and inspecting wires can easily be done at home. These steps save money and give riders a deeper understanding of how their bikes work.
However, when the controller shows repeated failures or when burnt circuits are visible, it’s time to hand things over to a technician. Specialized shops have diagnostic equipment that can detect faults invisible to the naked eye. This ensures the bike is repaired correctly and safely.
Learning how to troubleshoot e-dirt bike controller issues also means knowing when not to push further on your own. If the bike continues to cut out, overheat, or produce error codes even after basic checks, professional help will prevent costly mistakes and keep rides safe.
FAQs About Troubleshooting Controllers
Why does my controller overheat?
Overheating usually happens when airflow is blocked, dust builds up, or the system is overloaded. Keeping the bike clean and respecting its power limits reduces this risk.
Can I repair a damaged controller or do I need to replace it?
Minor issues like loose solder joints can sometimes be repaired, but if the circuit board is burnt or heavily corroded, replacement is usually the only option.
What tools are essential for troubleshooting?
A multimeter, contact cleaner, and a basic set of screwdrivers are enough for most at-home diagnostics. These allow you to test signals, clean connectors, and inspect components.
Do error codes always mean the controller is faulty?
Not necessarily. Error codes often point to related systems like the battery, throttle, or wiring. Understanding them in context is what makes troubleshooting effective.
If you’re new to the basics of how these systems interact, check out our beginner’s guide to electric dirt bikes for a clear breakdown of the main components. It will give you a stronger foundation for mastering how to troubleshoot e-dirt bike controller issues.
Wrapping It Up: Keep Your Ride Smooth & Reliable
Mastering the basics of controller care can make every ride safer and more enjoyable. By paying attention to signs like sudden power loss, throttle lag, or unusual error codes, riders can often fix small problems before they grow into expensive repairs.
Consistency is key. Cleaning connectors, monitoring battery health, and testing wiring regularly all contribute to longer-lasting performance. These small habits build confidence and reduce downtime.
When you understand how to troubleshoot e-dirt bike controller issues, you gain control over your bike’s reliability. Instead of guessing what’s wrong, you’ll know how to pinpoint the issue and take action—keeping the trails fun and frustration-free ⚡.
Share Your Experience With the Community
Troubleshooting gets easier when riders exchange tips and real-world experiences. What worked for one person might save hours of trial and error for someone else. That’s why sharing your solutions and questions helps the entire community grow stronger.
If you found value in this guide, pass it along to a friend or another rider who might be dealing with controller problems. Every shared story adds to the collective knowledge and helps others feel less frustrated when their bikes act up.
And if you’re still building your foundation, don’t miss our beginner’s guide to electric dirt bikes. It connects all the pieces so you can better apply what you’ve learned about how to troubleshoot e-dirt bike controller issues.
Drop a comment with your own hacks or ask questions—the more we talk, the better prepared we all are to keep our rides smooth and reliable ⚡.

Tyler Brooks is the storyteller behind most of the content at Electric Dirt Zone. With over 10 years of experience in digital media and a lifelong love for off-road riding, he blends technical insight from the team with engaging, down-to-earth writing. When he’s not turning dusty trail rides into blog posts, you’ll probably find him snapping pics before things get too wild.